[vc_row][vc_column][vc_column_text]
HOW TO RECORD WITH YOUR MARCUM UNDERWATER CAMERA
[/vc_column_text][vc_row_inner][vc_column_inner][vc_empty_space][/vc_column_inner][/vc_row_inner][/vc_column][/vc_row][vc_row][vc_column][gem_youtube video_id=”v8cuhT3LFlg”]
On most of the units, recording underwater footage is relatively simple. However, it will require a little bit of extra gear on your part.
Whether you have the Mission, Quest, or Recon 5+, we go through a detailed explanation detailing how you can record with each of our popular devices below.[/vc_column_text][/vc_column][vc_column width=”1/6″][/vc_column][/vc_row][vc_row][vc_column][vc_empty_space][/vc_column][/vc_row][vc_row equal_height=”yes” content_placement=”middle”][vc_column width=”1/2″][vc_row_inner][vc_column_inner][/vc_column_inner][/vc_row_inner][vc_single_image image=”46782″ img_size=”full” alignment=”center”][/vc_column][vc_column width=”1/2″][vc_column_text]
IDENTIFYING UNDERWATER
CAMERA OUTPUT
[/vc_column_text][vc_column_text]When deciding what you need to record, your first goal is to determine what your underwater camera has for an output. The 3 options are generally:
- AV (traditional Video Out)
- HDMI
- Direct SD
[/vc_column_text][/vc_column][/vc_row][vc_row][vc_column width=”1/6″][/vc_column][vc_column width=”2/3″][vc_column_text]You will discover which one applies to your camera by looking at the back of your unit. If you have an older unit, it’s very likely that you will have AV Out, and therefore require an RCA cable and converter. If you have the Quest, you will be using HDMI cables, and if you have the Recon 5+ you only need a microSD card.
Once you have identified which output your underwater camera has, you can find the instructions below.
The order is:
- Mission & VS485C
- Quest
- Recon 5+
[/vc_column_text][vc_empty_space][/vc_column][vc_column width=”1/6″][/vc_column][/vc_row][vc_row equal_height=”yes” content_placement=”middle”][vc_column width=”1/2″][vc_column_text]
MISSION, VS485C (AV Out)
[/vc_column_text][vc_column_text]Our two most common cameras that use Video Out are the Mission and VS485C. Because this is older technology, you will also need a converter, a device to record on, an AV cable and HDMI cable. It seems like a lot, but each is very common and easy to find. In fact, you will likely have many of these accessories in your home already.
You can find the RCA, HDMI cables and converter at your local Best Buy or online (Amazon).
As for the recording device, you can use a DVR, camcorder that has an AV input, or a game capture. The easiest to find is going to be the game capture. You can pick this up at Best Buy or Amazon pretty quickly. If you buy an AVerMedia game capture, it comes with the HDMI cable.[/vc_column_text][/vc_column][vc_column width=”1/2″][vc_single_image image=”46784″ img_size=”full” alignment=”center”][/vc_column][/vc_row][vc_row][vc_column][vc_empty_space][vc_column_text]
RECORDING INSTRUCTIONS
[/vc_column_text][gem_youtube video_id=”MhIz6cR_nVk”][/vc_column][/vc_row][vc_row][vc_column width=”1/6″][/vc_column][vc_column width=”2/3″][vc_column_text]First, you will need to make sure you have the following supplies on hand:
- Game Capture or DVR (must have “AV in” port)
- AV Cable
- Converter
- Portable Charger (or simply use the Lithium Shuttle!)
- HDMI Cable (comes with Game Capture)
- MicroSD Card
- 1. You will need to use your shuttle or portable power supply to power the adapter and game capture. They require power to work.
- 2. Once those are both hooked up to your portable power bank, you can then take the RCA cables, grab the yellow cable, and put one in the converter and the other in the back of the underwater camera.
- 3. Finally, you will need to take the HDMI cable and put it from the game capture to the adapter.
Last but not least – make sure you have a microSD card in the game capture.
That’s it! You can start recording.
Game capture settings to remember:
- Blinking red means it’s recording.
- Solid red means there is a problem with the camera or SD card.
- Blue means everything is good to go but NOT recording.
[/vc_column_text][vc_empty_space][/vc_column][vc_column width=”1/6″][/vc_column][/vc_row][vc_row equal_height=”yes” content_placement=”middle”][vc_column width=”1/2″][vc_column_text]
Quest Camera
(HDMI Out)
[/vc_column_text][vc_column_text]The Quest camera isn’t known only for its high-quality video and display, but also that it has a built-in HDMI feature. With HDMI-out, recording from the camera is a breeze. In fact, HDMI is one the most common type of video output for modern media – meaning you likely have on with your Blu-Ray player, Roku Player or TV.
Before you begin, make sure you have the following supplies:
- Game Capture (or alternative source that takes AV in)
- Portable Charger (or use the USB ports on your Lithium Shuttle)
- MicroSD Card
[/vc_column_text][/vc_column][vc_column width=”1/2″][vc_single_image image=”46808″ img_size=”full” alignment=”center”][/vc_column][/vc_row][vc_row][vc_column][vc_empty_space][vc_column_text]
RECORDING INSTRUCTIONS
[/vc_column_text][gem_youtube video_id=”wkYWW1ZyVCs”][/vc_column][/vc_row][vc_row][vc_column width=”1/6″][/vc_column][vc_column width=”2/3″][vc_column_text]HDMI recording on the Quest is easy. You won’t need RCA cables or a converter. Instead, you will simply need the game capture (should come with HDMI cable), power bank, and the camera. It’s that simple.
- Plug one end of the HDMI cable into the camera and the other into the game capture.
- Then take the power bank (or Lithium Shuttle) and use it to power the game capture.
- Make sure you have your microSD card in it and hit record!
Game capture settings to remember:
- Blinking red means it’s recording.
- Solid red means there is a problem with the camera or SD card.
- Blue means everything is good to go but NOT recording.
[/vc_column_text][vc_empty_space][/vc_column][vc_column width=”1/6″][/vc_column][/vc_row][vc_row equal_height=”yes” content_placement=”middle”][vc_column width=”1/2″][vc_single_image image=”46788″ img_size=”full” alignment=”center”][/vc_column][vc_column width=”1/2″][vc_column_text]
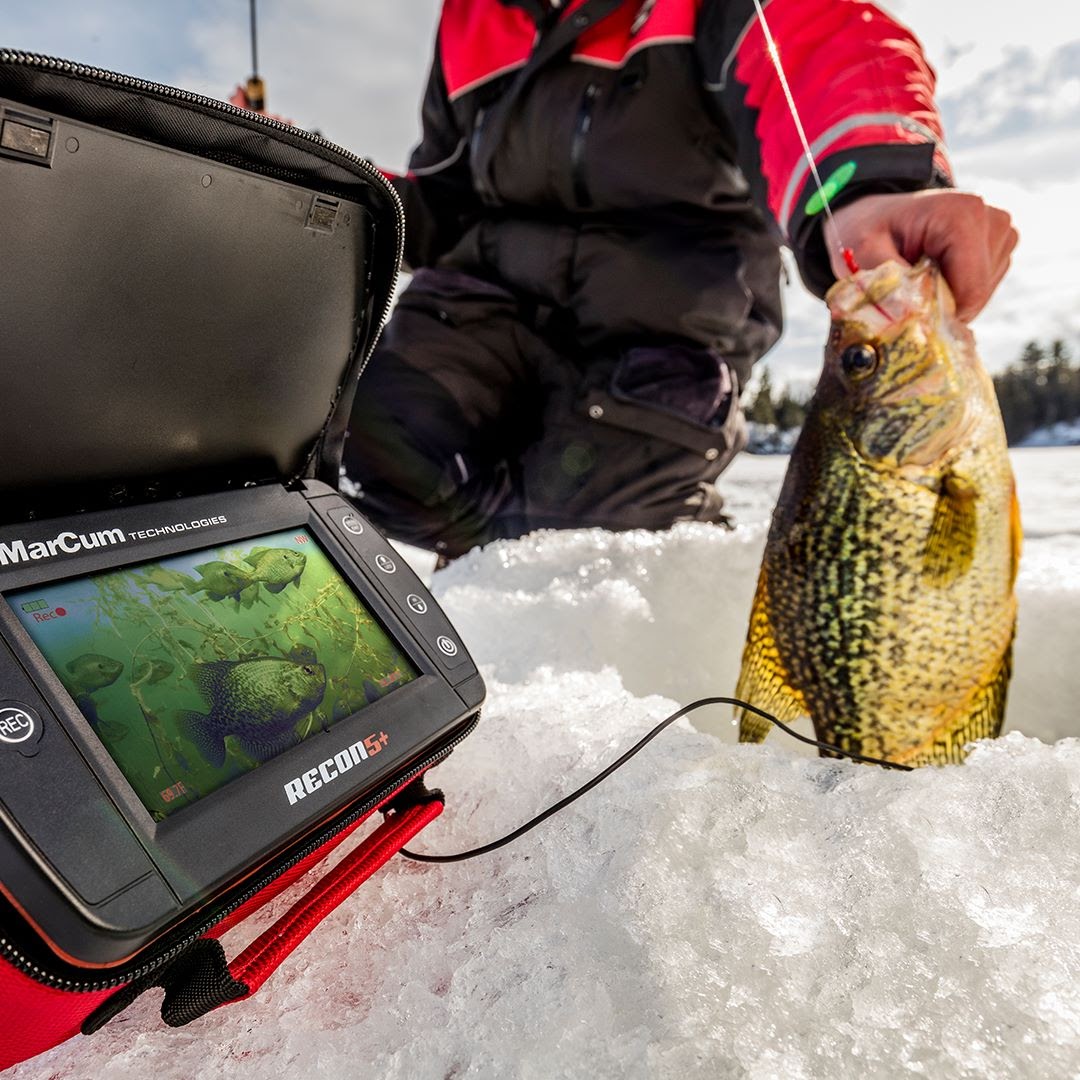
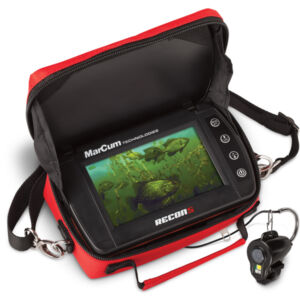
RECON 5+
(microSD BUILT-IN)
[/vc_column_text][vc_column_text]The final and easiest way to record is to do it directly in the unit with a microSD card. The Marcum Recon 5+ is one of the few cameras with this feature. This makes recording as simple as hitting a button.
If you have this type of system all you need is a class 10 microSD card.
Make sure you format it before you use it.
My 3 recommendations when dealing with MarCum Recon Plus footage:
- Use VLC player (you can download it for free) when working with your computer.
- Use a well-known brand of microSD card when recording.
- Format MicroSD card before use.
[/vc_column_text][/vc_column][/vc_row][vc_row][vc_column][vc_empty_space][vc_column_text]
RECORDING INSTRUCTIONS
[/vc_column_text][/vc_column][/vc_row][vc_row][vc_column width=”1/6″][/vc_column][vc_column width=”2/3″][vc_column_text]All you are going to need to do is put the microSD card in the camera, format it, and then hold the record button. It’s that easy![/vc_column_text][vc_empty_space][/vc_column][vc_column width=”1/6″][/vc_column][/vc_row][vc_row][vc_column][vc_column_text]
FINDING YOUR PERFECT UNDERWATER CAMERA
[/vc_column_text][/vc_column][/vc_row][vc_row][vc_column width=”1/6″][/vc_column][vc_column width=”2/3″][vc_column_text]Whether you want a high definition experience in your permanent house or a portable unit to use on the go, we have you covered. From every price point and application, MarCum has the highest quality cameras on the market. Be sure to check out our latest deal on the MarCum Quest, MarCum Mission, and Recon 5+ right here![/vc_column_text][/vc_column][vc_column width=”1/6″][/vc_column][/vc_row]


